Monday, July 30, 2012

A "Surreal" Bedroom + Dresser Makeover

One of my sisters lives in a 1950s bungalow duplex that is in pretty rough shape. They bought both duplexes with my parents with the intention of building a triplex (or bigger and better duplex) within a year or so.


It's been 3+ years. 


When they moved in they didn't bother making any major renovations or even painting the place. Why waste money when they planned to be out of there ASAP.


Well in the 3+ years since they've lived there, their family has grown from 3 to 5. And all 5 of them were sleeping in one bedroom in the basement. It was time to do something about this.


The main floor has one bedroom-turned-playroom, which was this horrible pink shade: 


Life Designed
The picture doesn't do it justice. It's terrible.

Sunday, July 29, 2012

DIY Terrariums With Thrift Store Vases + Apartment Therapy Feature!

So I know I'm kinda late on the scene with this but... I love terrariums!


They look so lovely and are SO much fun to make! 


And trust me, you do not need a green thumb to make 1 (or 12) of these.


When my friend and I went shopping for terrarium jars, we hit up thrift stores to see what we could find. 


At first, we didn't find anything and we were just about to leave when then I asked my friend, why not use a large brandy glass?


She loved the idea! I love that we're on the same wave length!


We picked up a few different items in addition to the brandy glass. When shopping for terrarium jars, don't be confined to the typical jars ie. mason jars. Use wine glasses, candle holders, candy dishes etc. (Don't get me wrong, I love mason jars! In fact we made about 5 mason jar terrariums!)


Life Designed
Here are a few we made using dirt cheap (pun intended haha) potting soil from Home Depot ($3 for a HUGE bag), irish moss, mini cactus and rocks- my friend found some jars of little rocks at Chapters for $2. We also gathered some larger rocks from her backyard.


We were on a roll and made about 8 terrariums with the intent to make a whole lot more! 


Have you made a terrarium?


If not, you've been warned- they are so addicting!


PS The other day, I found out from my friend that I've been featured on Apartment Therapy! Thanks to Colleen Quinn for finding my DIY Bar Cart post and featuring it! Check out her post here.

Thursday, July 26, 2012

DIY Console Table

Last week my sister mentioned that they needed a console table for their entry and asked me where they could buy one. 


Buy one?


I'll make one!


And just my luck, I happened to come across Diary of a Preppy Mom's blog where she had a tutorial on how she made her fabulous console table.


Diary of a Preppy Mom
It's perfect. Just what I was looking for!


So with that, I set out to make it. Fingers crossed....

Monday, July 23, 2012

Baby Shower Pop Quiz!

The other day an anonymous reader kindly asked me to share the pop quiz I made up for my sister's "She's About To Pop" baby shower


Life Designed: She's About To Pop Baby Shower
I did post a picture of the pop quiz in that post but not a very good one and it got cut off. 


So here it is:


Life Designed

Can you unscramble them? (Answers are below)


I labeled the two categories to help make it a bit easier and all the words have the word "pop" in them so that made it even easier! Some people got the answers right away- while others needed some coaching. =)


After they unscrambled them, they had to blow up a balloon and then pop it - I told them they could pop it using any means possible but that's too easy! I should have told them they had to pop it using only their bodies. It's hilarious to see grown women try to sit on a balloon to pop it! 


OK, here are the answers:


1. Mary Poppins
2. Pop Goes The Weasel
3. Popeye The Sailor Man
4. Lollipop
5. Popcorn
6. Pop Tarts
7. Pop Rocks
8. Ring Pop
9. Jalapeno Poppers
10. Corn Pops
11. Popsicle


How'd you do?


And thanks Anonymous for the inquiry! =)

Friday, July 20, 2012

DIY Pipe Bar Cart

Look what I made! My first piece of furniture that I designed and built all by my lonesome!
Life Designed
When my friend said she needed a bar cart for her new home, it didn't surprise me one bit!
I had meant to talk to her about it a while ago, but with everything else we had to focus on, the bar cart got sent to the back burner. 

I thought about converting an old change table into a cart but hadn't found anything that would be suitable for her style.

Wednesday, July 18, 2012

Turn A Coffee Table Into A Bench!

I've been keeping an eye out for a simple coffee table that I could turn into a bench. It's been a long hunt...but at last! I thought I found the perfect table at a second hand store. And at $19 it was too good to be true!


Well... it was. 


Life Designed
It's not the best piece of furniture (as in- it's not solid wood, it has a woven detail on the sides which I did not know about when I went in to buy it!).


But... it was only $19 and I drove across the city to get it so...it came home with me! I can work around this. 

Friday, July 13, 2012

Mixing It Up- Dining Sets

For my friend's new home: think industrial, rustic yet clean, fresh and simple.


No clutter for this gal! Colour palette? Neutral: whites, greys, wood tones with pops of fresh colours. Love love love it. It's very on trend yet I think it'll be timeless!


I posted the thrift store dining chairs I found for her a couple days ago and it got me thinking about different things we can do.


I love mixing it up. Whether it be a bench and chairs, different chairs, different coloured chairs, etc. let's have some fun in the dining room!


Here are some inspiration pics I've had saved on my desktop. Sources unknown so if you recognize any of them, please let me know!


Aren't these chairs great? And if you ever questioned different coloured chairs, I think this will change your mind!


It works because of all the white going on around the colours. The colours add a nice pop without being overwhelming or tacky. It also helps that the chairs are all the same style. So even with different colours, there is still cohesion and it looks like a family.


Thursday, July 12, 2012

Thrift Store Find + A Lesson Learned!

I love thrift store shopping. Hopping from one store to the next looking for little treasures is one of my favourite past times.


Last week, my friend and I came across the most perfect set of dining chairs for her new home. They needed some work but they were only $10 each! Up until then, I was looking at chairs that were $100 each!


Unfortunately, I don't have a picture of them, but they were mid century wood chairs with upholstered seats and backs.


My friend's brother in law used to own an upholstery shop so we wanted to check with him first. As we left the shop empty handed, I hoped they would still be there the next day.


Well the next day, we got word that it was a go! I rushed to the store but they were gone. No big surprise....those were great chairs.


We were bummed. I think I was more bummed but I want to show it.


All we could say was, "It wasn't mean to be".


Last week after a day of shopping, I was driving along and out of the corner of my eye, I saw some red chairs. I probably wouldn't have noticed them if they were any other colour!


I didn't get a good look at them and I was on my way to meet another friend but I just had a feeling.... so as soon as I could, I swung around.


I thought it was going to be simple swing around the block but there were blocked off alley's, cul de sacs, no exit roads, etc. I went about 8 blocks out of the way turning this way and that way. I almost gave up. Almost.


Ya'll know I'm pretty stubborn.


So when I finally got back on the main street, I was delighted to see that the chairs were decent!


Life Designed
I like the dark brown wood although it need refinishing. The red has to go- I'm thinking light grey. We still have to go fabric shopping.

Wednesday, July 11, 2012

Ratty Ol' Shoes? No Problem!

Do any of you have a pair of shoes that you just absolutely love and would buy 5 pairs of them just to ensure you'll always have them in your life?


I'm sure you do. What girl doesn't!?!


I'm not talking about anything fancy here. These ol' shoes have been my go to shoes for years. Years.


Life Designed
I promise my feet are not that dirty! These shoes are so loved, the colour is rubbing off. Ok... it might also be a little bit of dirt... I've had these for over 6 years! What do you expect? =)


And yes, those are massive cracks...they are literally falling apart. But they're still comfy!


I can't remember the shop name, but I know it was in Oregon! And I got them for about $20- tax free! I love Oregon!


So you're probably thinking, what's so great about these, right? Aren't simple black flats a dime a dozen these days?


I don't know what it is, but I haven't been able to find a pair as comfortable as these! And believe, I've been looking! (Oh and I'm also not looking to break the bank on a pair of flats...)


Every pair I've tried on feel funny, fit weird, hurt my feet, etc.


I can walk hours and hours in these shoes without a single blister and my feet blister easily!


So what's a girl to do....It's embarrassing whenever I go to a friend's house and have to take my shoes off because well... you saw them! They look terrible!


I don't know if these exist, but someone seriously needs to make shoe inserts for issues such as these...I can't use insoles because the shoes already fit me perfectly. I guess I could cut out a piece of thin, but stiff fabric and make my own insert...


Or, I can just whip out a can of spray paint!


I don't know what's taken me so long to do this.


After a couple coats of Painter's Touch black paint in matte and a coat of clear sealant:


Life Designed
As good as new! Minus the cracks...


I'm actually considering duct tape and then spray painting over that...


Now my feet can be as dirty as I want and no one will ever know! Haha

Tuesday, July 10, 2012

Strawberry Cheesecake + Happy Birthday Sister!

Happy Birthday to dear sister! Middle age never looked so good!

Haha, I always joke that my sisters are middled aged even though they're only in their mid 30's. It's better to accept aging sooner than later right? =)


Life Designed
For her birthday I attempted yet another cheesecake...This time strawberry! 

Life Designed
OK... so I know it doesn't look the greatest...but it's still a major step up from my previous cheesecake attempt from this post.


Monday, July 09, 2012

Truffles V 2.0

So last week I blogged about my first time making truffles.


Well the other day I looked at the 1/2 package of cream cheese left in my fridge and decided to give it another go!


Second time around was much more successful!


I took this recipe that I used the first time around and modified it a little bit. This is a picture from the first batch. Appearance: 10! Taste: 5....


Life Designed
I only had enough cream cheese to make about 30 truffles so I cut the recipe in half.  As mentioned in the previous post, the truffles were really really rich. Too rich. My friend said she couldn't even finish one! I actually couldn't even finish one and I love chocolate!


So this time around, I used 1/2 package of cream cheese and reduced the amount of chocolate chips and icing sugar to about 3/4 - this wasn't calculated or anything, it just happened to be all the ingredients I had left! (The original called for 1-1/2 cups of each)


Well, it worked out much much better. It was pretty sticky to work with - even after chilling it.
However, I didn't mind one bit because it made the truffles so so creamy- they literally melted in my mouth. AND they tasted a lot better because they weren't nearly as sweet. 


Oh and toast the pistachios! I can't believe I didn't do that the first time around. It makes a world of difference!! It really brings out the flavour and makes them more crunchy!


Truffles are so fun and easy to make, you can have all sorts of toppings on them and even in them! And if you take the time to package them nicely, they make a great gift! 


Modified recipe for 30 bit size truffles:


1/2 package of cream cheese
3/4 cup semi sweet chocolate chips
3/4 cup icing sugar
3/4 teaspoon vanilla


I love this ratio because it's more of a creamy texture with a cream cheese taste and I love cream cheese! 


If you want it a tad sweeter and a bit more firm- up the dosage to 1 cup each of chocolate and icing sugar.


The nice thing about making truffles is you can taste and adjust the sweetness as you go along- it's not like cookie dough where you're eating raw eggs. (Although I admit, I've been known to eat a bit cookie dough/cake batter!)

Friday, July 06, 2012

Easy Truffles!

This past Monday I went to a friend's house for a BBQ gathering and I volunteered to bring desserts. In case you haven't noticed, I'm on a major baking spree these days.

I've always loved baking but lately I've been loving it more and more and now that's summer, I actually have time to bake!

My friend who's a 7th grade teacher had her kids make truffles for their mothers for Mother's Day. What a great idea! I don't remember making anything for my mom at school for Mother's Day...do you? Maybe a card?

So anyways, I asked her for the recipe because hey, if 7th graders can do it, surely I can too.

And easy it was! You can use all sorts of different coatings but I went with cocoa powder and pistachios.

Life Designed
I'll admit, they looked pretty good!

The recipe she gave me was really simple- just the way I like it! Why haven't I made these before?!

They are really really rich though. I recommend a little more cream cheese and a little less icing sugar. 

I chopped up the pistachios but didn't think to toast them!

Life Designed
That's another adjustment for next time!

Untoasted, and after being in the fridge overnight, the pistachios were not as crunchy! I think if they were toasted, they would taste better and be a little more crunchy!

Life Designed
My friend also suggested making them smaller so that you could pop them in your mouth without having to bite into them 2, 3 times.

In addition to these truffles, I also wanted to make something else!

Remember these keylime cupcakes? I initially planned to make these as they main dessert but then I had the brilliant idea to make a keylime cheesecake instead.

It's been several years since I last made a cheesecake. About 5 years in fact. I remember making it with my friend and we had to take turns beating the cream cheese by hand because we didn't have an electric mixer. Talk about a major work out! But the cheesecake turned out well and I love cheesecake so I figured I'd give it a shot. How hard could it be right?

Well...

Life Designed
Epic fail...

I don't know what happened! I tried baking this thing for over almost 3 hours and it just would not bake. And there I was, happy that the top hadn't cracked!

I even Googled it and tried rebaking it at a lower temperature. I tried the water bath method which I had never even heard of!

I thought just the center hadn't baked but when I cut into it, I realized, none of it, other than the top layer had baked. Even the crust was soggy... what in the world...by this time it was 2am.

So I did what anybody would do after trying to bake a cheesecake for 4 hours. I shredded it. This pic was taken about half way through my anger. Haha

Ok so I MIGHT have an idea of what went wrong.

The recipe called for butter.

I didn't have any. It was 10pm, the party was at noon the next day so... I used margarine. It was only 6 tablespoons. How much damage could happen with 6 tablespoons?

Well I think that's where I went wrong.

But still. Really? There was only margarine in the crust. Would margarine prevent the whole cake from not baking?

Well, either way... it was a major fail.

I'm a little gun shy now.... pancake flat cookies, uncooked cheesecake... I'm not on a good roll. I might have to give it some time before I try a cheesecake again. =)

Thursday, July 05, 2012

Summer Style Lovin'


As much as I love neutrals, I also love colour!

One of the things I loved so much about Chile was the abundance of colour, everywhere! And it wasn't overwhelming or tacky. Somehow all those colours just worked!

As I'm sure you've noticed, this summer is all about colour! Bright colours- somewhat of a throw back to the 80's, but much cooler of course!

Also hot is gold gold gold! I used to be a silver only type of girl especially when it comes to jewelry but for the past couple of years, I've gravitated towards gold jewelry. And I actually think it looks better on my skin tone.

Rose gold is currently really trendy but I like just plain yellow gold. I've been coveting a Michael Kors gold watch for a while now.... And last week, I finally went to Holt Renfrew and tried a couple on. Disappointingly they didn't look so good on me. Darn..

So I've been surfing the web for gold watches and came across this:

Nixon
Love it. Love it. Love it!

It's simple and beautiful! One day it shall be mine! Well I guess I should try it on first. But this is definitely on my current wish list!

Continuing on this gold theme:

I've had this cross necklace for several years now. Up until I bought this, I only had silver necklaces. Now, I have a few gold ones but this one is my go to everyday necklace. I got it from this Etsy vendor for what I think is an awesome price of $38 USD:

Etsy Sideways Cross Necklace
I have the 15-3/4" chain- I like it sitting right against the bottom of my neck and the cross is really small- about 1/2" long. (There are longer chains available if you like it hanging lower)

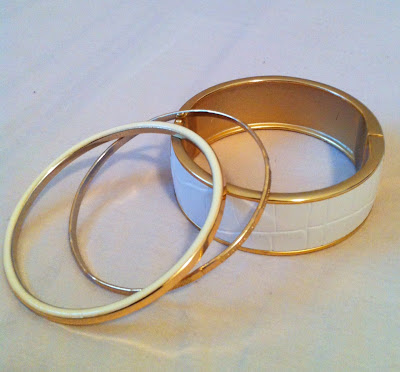
Many many years ago I had cheap gold bangles which I bought on a whim and never wore. I ended up selling them at a garage sale because I thought they were tacky. Now years later, I have bought myself gold bangles once again. And this time, I love them!

Life Designed
I wear a combo of these almost every day. The thick gold white and gold bangle is a lucky find from Zellers of all places! It was on clearance for $5.

The thin gold ones came in a set of about 10 bangles. I think I got them from Forever21. I love the little detail of the bangle having a creamy white trim. Nice touch.

I don't normally wear bangles because I have small wrists and extra small hands so bangles usually slide right off. So when these fit, I knew I had to get them!

Also on my wish list in addition to the Nixon watch, are Ray Ban sunglasses. I love the Aviators. They're classic and awesome. I think I love them that much more because I associate them with my dad. He's been wearing them every since I can remember.

A couple summers ago, I bought wannabe Ray Bans from H&M for $7. I think it's time for the real deal...

Ray Ban Aviators
I can't decide between the brown or green lens! Apparently I'm not the only one and Ray Ban has caught on! They have these flip out ones where you can interchange the lenses! Awesome.

I also really like the Wayfarer shades. Remember I said we're hitting up the 80's style again? 
Ray Ban Wayfarer
I like them both and they look good on just about anyone. But if I could only choose one, I'd go for the Aviators for sure.

Shall we look at some colour now?

Forever21
Yes, it's really that bright!

I was wearing all black to the wedding I decorated in June so I wanted a pop of colour in my accessories. This is from Forever21- I can't find it on the site anymore. I think it was about $20.  As you can see, it's a quilted neon pink purse with gold hardware. The chain however is really long (I'm only 5'-1") and not adjustable so I might take it to a shop and get it shortened or attempt to do it myself. I'm not sure if it's worth it. It's such a trendy seasonal item which is why I spent months searching for what I wanted on a budget. It was bought online and the colour wasn't nearly as blinding on screen. I do wish it was little toned down but like I said, it's a trendy item. It'll do!

For the wedding outfit, I also got these earrings from Aldo which I love and they got a lot of compliments too!

Aldo
Are you noticing a trend? When it comes to accessories, I'm loving colour with gold!

These earrings are awesome. They've got some weight to them and are quite long. They just barely graze my shoulders.

Anthropologie
I had also bought this back in May thinking I would wear it to the wedding. It was a little pricey at $24 but that's Anthropologie for ya! I love that store by the way, it's just currently a little out of my budget. But I splurged and got this in part because I had just gotten back from Chile and hadn't bought myself anything except for 2 small paintings from a guy off the street for $6. 

This bracelet reminded me of the colours you see all over in Chile! Initially I loved the magnetic clasp but over time I realized it was so easy for the clasp to come apart. If the bracelet got caught on my purse or something, it fell off my wrist. And I was noticing it was happening more and more. I'm scared of losing it so I haven't worn it in a long time. When I get around to it, I'll switch out the magnetic clasp with a typical hook clasp and then it'll be on my wrist with those gold bangles non stop!

So tell me, how do you feel about orange?
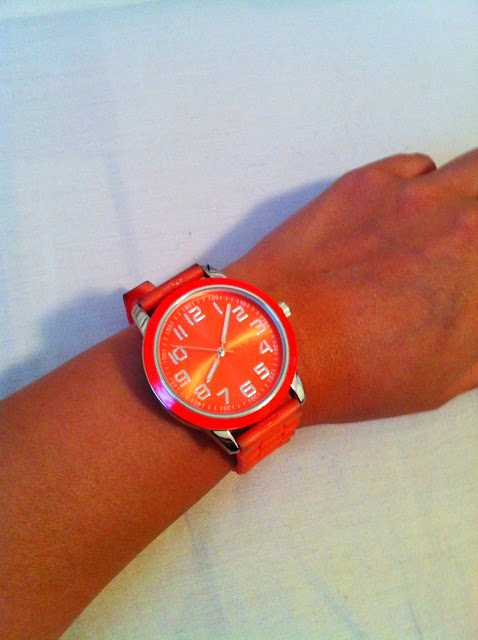
Target Watch
I bought this silicone watch from Target for $12 last summer. It was the first watch I'd bought and worn in years! I get a lot of compliments on it and people are always surprised it's a cheap Target watch! It's the only watch I own... until I get that Nixon watch! Haha

Kate Spade
I love my Kate Spade bag. It's a beauty. And even more beautiful- I got it at a steal of a deal from the outlet store in 2010. At the time I took a major chance with this colour but I just loved it. It's such a nice, saturated orange that makes me happy and I'm also very happy to see orange is "in" this season too! 

Do you notice with this bag and the watch, the hardware is all silver? A few years ago, even a year ago, gold was tacky and now it's everywhere! If these pieces were on the shelves today, they would no doubt, have gold hardware!

And now let's end this post with a neutral!
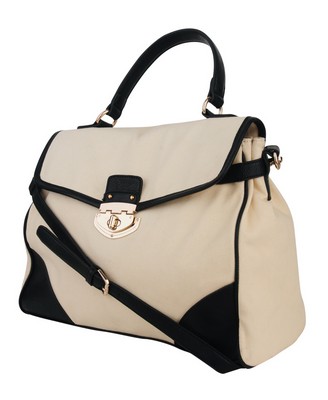
Forever21
When I was online searching for the pink purse, I came across this black and cream canvas bag from Forever21. I immediately put it in my shopping cart! It was a little more than I wanted to spend at $40 so I waited a couple weeks before I purchased it. I didn't want to just buy it on a whim. 

Well, I'm so glad I bought it! I've been using it almost everyday. I love everything about it. The shape, the gold hardware, the longer strap option, the clasp, the colour, the light weight canvas material... everything! 

Ok that's all for now folks! I hope you enjoyed my summer accessory loves! 

What are you diggin' this summer?

Tuesday, July 03, 2012

Peanut Butter + Nutella Cookies?

I remember the first time I had a peanut butter cookie. 


My neighbour, who's kid my sister's and I played with and babysat, baked us a batch and at first I was thinking, "what kind of cookie is this with the weird bumps on top?" And then... it melted in my mouth. Peanut butter goodness....


Since then, all those many years ago, I've always wanted to make peanut butter cookies but for whatever reason, I just never did. I'm thinking it's probably because when push comes to shove, chocolate always wins.


Well, I mentioned a couple days ago that I was at my sister's house where we made banana bread and since we happened to have the ingredients, I decided it was finally time to make some peanut butter cookies!


Using the same "quick" "simple" "easy" method I mentioned before, I found the Kraft Canada site that listed only 3 ingredients to make these cookies. That's pretty darn quick, simple and easy. 


But maybe a little too easy. 


Such limited ingredients... how would it taste?


So I stepped it up a notch and went for this recipe. (The picture they use on the site does not look like your typical peanut butter cookie...)


Now for peanut butter sandwiches (I eat mine with sugar- I know that's weird. Most people add jam or honey... I have yet to meet another person who eats peanut butter and sugar sandwiches) I usually go for the smooth spread. The Kraft recipe called for smooth. Peanut butter cookies need the crunch in my opinion! 


And that's exactly the kind of peanut butter my sister had. Good girl.


These are super easy to make. The only tricky part (and it's not even that tricky) is the criss cross pattern: 


Life Designed
Do not be skimpy when flouring the fork or else you get a mushy mess. I could have started over, but I was too impatient. I was using a little convection oven so I had to bake these 3-4 cookies at a time!


Life Designed
Note: watch these babies carefully! They are so easy to over bake!


Well, thankfully they tasted pretty good.  Not too sweet and very peanut buttery!


The only thing is they were a tiny bit grainy for me but my sister thought they were fine. Oh and the cookies my neighbour made were a lot thicker. I just read on another site that if you add 1/2 cup more flour and 1/2 cup more of peanut butter that they turn out thicker.


I thought about adding chocolate chip chunks but opted for Nutella! Ok it actually wasn't the Nutella brand. It was the Superstore version of Nutella.


Life Designed
The only difference should be the shade of cookie and the taste right?


Life Designed
Wrong.


Epic fail! 


The "nutella" spread changed the consistency of the batter and these cookies were even flatter! Notice you can barely make out the criss cross pattern. I don't know if you can really tell from this picture, but trust me, they came out paper thin!


This is the second time in 2 weeks that I made paper thin cookies! Haha! Please do not let this be a trend.


A little while ago, I made classic chocolate chip cookies with my nephew. I wish I could blame the kid for the disaster but it was all me. I was too impatient (again!) and melted the butter so the batter was all gooey and instead of refrigerating it to harder a bit... I baked the whole lot. 


If you desire paper thin cookies that look like they melted and not in a good way, follow my lead.


Oh with these peanut butter cookies, you could barely even taste the hazelnut chocolate! Good thing I only made a few of them.


My parents are going on an Oregon road trip with their friends this week so I'll give them a stash of cookies and banana bread to take with them! 


Funny how I rarely have a desire to eat what I've baked. At least not right away. ; )


Overall, I give this recipe an 8 out of 10. It doesn't quite live up to my childhood memory of my neighour's cookie, but isn't that always the case?


Do you remember the first time you ate a peanut butter cookie?

Monday, July 02, 2012

Neoclassical Side Table Makeover

My oldest and dearest friend recently purchased her first home! 

As happy and excited I am for her, no one is more excited than my friend- it's actually really cute. Not surprisingly, she's addicted to Pinterest and Craigslist and her obsession has paid off in big and great ways! Free rocking chair desk + chair? Score! 

She also picked up this wonderful little side table for $25. I love love love it!

Life Designed
Simple straight lines, fluted sides, tapered legs - typical neoclassical style. It's a beauty!
Not to mention it's in near perfect condition. 

Opting for a quick and easy way to paint this little guy, she picked up Krylon's spray paint: Dual paint + primer. I've never used this brand before so I was excited to give it a try. 

Life Designed
Pros: Quick dry! You're supposed to wait 2 hours minimum before you add another layer of spray paint, which is standard but my friend (like me) is uber impatient.  We actually got progressively more and more impatient. Before we sprayed this side table, we tackled a wooden chair and another side table. After the first coat, we were able to wait a whole hour! Subsequent coats got sprayed about 30 minutes later... 
Luckily there were no consequences!

Cons: This could be seen as a pro, but I found it to have a pretty wide spray. This was good to prevent the paint from pooling in certain areas. Each spray offered a light mist. The bad thing about this wide angled spray is when you need to spray a small surface area ie. the legs, paint got everywhere! This also meant a lot of paint was wasted. If you spray closer to the object, the field of degree is smaller but that's when you get a concentrated amount of paint and it starts to pool and drip. 

Another con: It sinks. Really bad. 

The smell itself is like any other paint but it's just really really strong. I'll admit I've been known to spray paint and paint indoors with little to no ventilation. Yes, I know it's bad and I've killed many brain cells. 

We sprayed the furniture outside on her balcony and maybe I was standing downwind but even with the fresh air, I still found the smell to be really obnoxious.

Smell aside, I would definitely buy this brand again. My friend and her husband will be happy because it'll force me to spray outdoors! 

So here's the little guy now:

Life Designed
Please forgive the terrible picture! Once she's all moved in and we decorate, I'll be sure to take a good picture of this guy. He deserves to shine!

I typically love changing the hardware on furniture but the little nubs on this piece was perfect and there was no need to switch them out. 

My friend's also into white, white and more white decor so we kept the nubs the same colour as the table. 

It's a lovely little piece isn't it?

I should mention she sprayed this little guy all on her own! Way to go!!

We're not quite sure yet where it's home will be. Either the guestroom, living room or entry. So many options...

I know right now Danish modern furniture is all the rage but it's refreshing to see a nod to the 18th century!

Do you agree or are you "Danish modern" all the way?