Monday, March 12, 2012

Martha Stewart Circle Cutter

Hello my blog friends! Forgive me, it's been a while. 

I've been swamped with school. We're reaching the end of the year so we're all stressed out with multiple projects that we're juggling.  I'm exhausted...

However my nephew's 5th birthday party is this Saturday so I've got to get myself together! 

I usually make some sort of Happy Birthday banner and since one of his many themes is "the ocean" (as per his request) I'm making a banner that sort of resembles bubbles... (sort of..) I'm going to have fish on either end so it'll look like the fish are saying "happy birthday!"
Oh my goodness, I'm so tired. Does any of this make sense?! Haha

So usually when I make a banner with circles, I end up hand cutting them which takes a long long time! So today, I finally invested in a circle cutter! 


It's not the cheapest buy at $30... but of course I had my 40% off coupon! This one can cut a circle up to 5 1/2" in diameter and as small as 1". 
I was tempted to also get the larger one which cuts circles from 4" to 12" but... there's no way I can justify buying both! At least not at the same time. =)


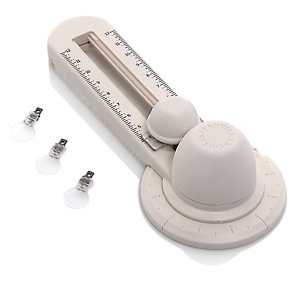
Both cutters come with 3 blades which is nice. 

I already had a print out of the circles which were 4":


I found it hard to line it up to cut perfectly sized circles that matched my print outs. Luckily the blue circle outline was on the thicker size so I ended up using the 3-15/16" hole rather than the 4". 


It was still a bit hard to match up and some ended up a little skewed:


Oh well. Beggars can't be choosers. 

Tip: Before committing to the cut, hold the blade in place but don't push down on it and create the circle just to make sure you're actually going to be cutting what you want to cut. (Hm.. that was really hard to word. Does that make sense?). If you have this cutter, I'm sure you know what I'm talking about. 

Also the instructions say to hold the cutter perpendicular but at times, I found it a lot smoother when I tilted it ever so slightly while cutting.  

All in all, it's a good little device but I definitely wouldn't ever buy it at full price. 

For the future, I now know to create an even thicker outer circle to allow for some slack and hopefully not get skewed circles. 

Have any of you used this type of circle cutter before? Any tips, tricks, frustrations?


Tuesday, March 06, 2012

DIY Nursery Feature!

A few weeks ago, Tara from Baby Lifestyles emailed me asking if she could feature the nursery I put together for my sister's baby.

Baby Lifestyles
What an honour! Thanks Tara!

I have a lot of love for this room. It was the first room I put together from start to finish!

And being on such a tight budget, I DIY'ed pretty much everything except for the crib, lanterns and rocking chair. When I put the room together, we didn't know the sex of the baby. Now, several months later, as I mentioned here, I'm itching to redo this room in pink!

For the Baby Lifestyles post click here.

And if you feel so inclined, take a stroll down memory lane with me with a list of posts I've written on this project:

The DIY Nursery Project

Life: Designed
Toy Chest Transformation

Life: Designed
ABC Cabinet

Life: Designed
Old Desk, New Change Table!

Life: Designed
Frames

Life: Designed

Other DIY projects involved:

I sewed the drapes and pillows (minus the duck pillow)! I am NOT a seamstress so as simple as they were to do, it was a major feat for me! =)

Sunburst clock:

Life: Designed
Globe lamp (on top of the book shelf):

Life: Designed
I LOVE that rug. I got it on sale from Anthropologie. I think it was about $20. My sister and bro and law have since replaced it with a plastic hockey rink rug.... Once the project's done, you can't control what people do. Haha

Well, I guess that rug is mine now! Whoo hoo. So it all works out.

Thanks for reading and going down memory lane with me! 


Monday, March 05, 2012

DIY Pottery Barn/Restoration Hardware Books

A while ago I came across these book bundles from Pottery Barn and Restoration Hardware:

Pottery Barn

Restoration Hardware
I think they were on their shelves a year or two ago, selling for about $30 a bundle. $30!!

I've been regretting selling almost all of my books when we moved last year. I love books but they're heavy! OK. Honestly, I love displaying books more than reading them... heh

I'm slowly starting to gather a new collection of "coffee table" books but their covers are what make them special so I'm not about to rip the covers off of them.

So for this project I headed to my local thrift shop. I'm planning on using bundles of these for my friend's wedding. The bride is a huge bookworm so I wanted to incorporate books into the centerpieces, not to mention: they're awesome!

Initially I dreamed of vintage hard cover classics like Pride and Prejudice but that's getting too pricey for the young couple's budget.
 
So even though the covers were going to be ripped off, I steered clear of the risque romance novels- the thrift stores are full of them! Thankfully I was at a Christian thrift store so they had a great selection of mainstream fiction, classics and Christian books. I got 19 books AND about 19 vases (for the lace candle holders) for $20. Score!

Life: Designed
Sorry for the blurry picture...

Even though it was just the cover, I was hesitant at first to rip them off! I've never ripped  a book in my life! But I did bite one once... As a child, I did some weird things to express my anger. One day I was so mad at one of my sisters that I took her Victoria Plum book and bit the cover so hard I left teeth marks. Haha...What the... Better than biting my sister I guess...

Life: Designed

Even with the cover ripped off, I couldn't have this title visible at the wedding! So I simply cut a piece of paper to size and wrapped some jute around the bundle.

Life: Designed
Done! This will look great (fingers crossed) with the lace candles and framed table numbers as centerpieces.

For displaying them at home, add a few more strings of jute to complete the look.

Life: Designed
You can forgo the jute if you don't like the look. Or, you can just recover your books with white paper as shown here below the jewelry box:


This way you can keep the original covers! Just make sure the paper is thick enough that the cover doesn't show through. I used a roll of white kraft paper from the art store. 

I love bundles/stacks of books! How about you?


Friday, March 02, 2012

DIY Angry Birds

My oldest nephew, Matthew is turning 5 at the end of March! Wow...I still remember seeing him for the first time in hospital; the first time I held him; watching him sleep and putting my finger under his nose every few minutes just to make sure he was still breathing. Gosh I miss those infant days...

I even miss the times he would cry like the world was ending when I babysat. The only thing that would soothe him was to fill the bathroom sink with water and let him splash his feet around.

Oh my goodness... my eyes are tearing up just writing this! Why do kids have to grow up so fast?

On the day of his brother's 2nd birthday party where I decorated it with a safari theme (in honour of his love for The Lion King), Matthew pulled me aside and said, "For my birthday can we have an ocean theme?? We can paint the walls and make it like an ocean!"

Honestly, the first thing that went through my mind was, "Oh man.. his birthday is during one of the busiest times of the semester" So I said, "I'll do my best but you know, Eemo (that means auntie in Korean) is going to be really busy during that time."

His response?

"That's okay. You don't have to paint the walls." Ha ha. How gracious!

Over the past few weeks, he keeps adding to his list of party "wants". So... we're having an ocean theme, with a "pin the arm on the Kung Fu Panda" (his idea), a transformers cake which the talented and wonderful May from Charmed by Sweets is making. So it's not really an "ocean theme"- it's more of a Matthew's-favourite-things theme. Which is what it should be as it is his birthday!

I've now added to that mish mash of favourite things and made an Angry Birds game. (Dian- it's gonna be a surprise so don't tell Matthew!)

Angry Birds
There are different ways to make these but since I have an abundance of cans at home (I've been too lazy to go to the bottle depot), I used gingerale cans. Perfect because they're green! I figured it would give me a good base.

I used Craft Smart paint in citrus green with a little bit of citron for the snout.

Life: Designed
The paint is kind of thin and after one coat, I realized this was going to be very LONG process...

Life: Designed
So I gave the cans a good coat of white spray paint as an even base to cover up all the text/graphics on the can. I'm not sure if that actually helped or not... Regardless, this was after about 4 or 5 coats:

Life: Designed
The colour is PERFECT!

Then I painted the pig faces using a black marker and some white out.... Yes.. white out...

For the "birds" I found these small "zoom balls" at Michael's for $1.50 each.

Life: Designed
 Which after a few coats of paint, turned into this:

Life: Designed
Haha! Ok so the blue one didn't turn out so great.... but I love the red one! He looks ready to knock out some green pigs!

Right now it looks like a bowling game but on the day of the party, I'm going to set these up in the front yard along with a mix of plain and painted cardboard boxes which will look like wood and concrete.

This should keep him and his friends busy for a few hours!! Heck, I wanna play! I love Angry Birds!

Next up on the party to do list....Make "pin the arm on Kung Fu Panda". Actually, I think I'll tweak it to "pin the dumpling in Kung Fu Panda's mouth"!

Kiddie parties are so fun! =)


Thursday, March 01, 2012

Side Table Makeover

Remember this little guy?


Life: Designed
This is what it looked like when I picked it up for $5 at the thrift store:


Life: Designed
I had painted it a turquoise colour for my niece's nursery but in the end there was no room for it in the nursery so I adopted it!


On the weekend with my gallon of left over paint from my dresser makeover, I finally gave it a mini fix.


Life: Designed
I do have thoughts to one day strip all the paint and have the top be a medium wood tone and the base white. But that might be for another time, another home. 

Life: Designed
I love how fresh, clean and airy it feels. It sits on a landing on the way up to my room so it sort of acts as a "what's to come" vignette. 


Just as a reminder, here's the dresser I recently made over using the same colours:


Life: Designed
I'm not one to think everything in a room needs to be matchy matchy but what else am I going to do with a gallon of this paint? Ha ha.